Marble has always attracted people with its special patterns, cold feel, and smooth surface.
Yet, even though it’s beautiful, marble needs regular care to keep looking great. Everyday use can eventually leave it looking worn out.
This natural stone is tough in some ways but also easily marked by spills and scratches. Marble can stain quickly, get scratched easily, and lose its reflective shine over time.
If your marble is starting to look dull or damaged, don’t worry; restoring its shine is usually possible. It just takes knowing the correct steps, whether you’re doing it yourself or thinking about calling a professional. If you’re in Sydney and dealing with major problems, it’s smart to get in touch with a stone repair specialist in Sydney first.
This article will show you the steps for restoring marble’s shine, including spotting the causes of dullness and the process for making your marble look new again.
Why Does Marble Lose Its Shine?
To fix dull marble, it helps to know why it happens.
Even though marble is strong and beautiful, it’s not immune to damage. Several things can make its shiny surface turn flat or rough.
Daily Use and Movement
This is the most common reason marble looks worn, especially on floors or countertops used often. Every time you walk on marble or put items down on it, tiny scratches and marks form.
Dirt or sand brought in on shoes acts like sandpaper, slowly smoothing out the shine. Over time, many tiny scratches add up, making the surface reflect less light and look dull.
Marble in busy areas gets worn down more quickly than in quiet spots.
The Effects of Cleaning Products and Acids
Cleaning is needed, but many common cleaners can ruin marble quickly. Marble is mostly made from calcium carbonate, which reacts badly to acids.
Even weak acids like vinegar or lemon juice – and many household cleaners, especially those with bleach – can leave permanent dull spots called etching. Etching looks like water spots but can’t be wiped away. Scrubbing pads or gritty cleaners also scratch the marble, making things worse.
Moisture and Humidity
While marble has been used in wet places for centuries, soaking or steamy conditions can harm it if it’s not properly sealed. Water can lead to mildew or hard watermarks, and if the marble isn’t sealed, stains can soak deep into the stone.
Humidity doesn’t usually dull sealed marble, but wet conditions can increase the risk of stains.
Types of Marble Damage
Besides just looking dull, marble can have other types of damage:
- Etching: Acidic substances damage the surface, leaving dull, lighter marks.
- Stains: Being porous, marble soaks up liquids like coffee, wine, oil, and more, leading to stains.
- Scratches: These come from things like dirt, moving furniture, or using the wrong cleaning tools. They can be shallow or deep.
- Chips and Cracks: Heavy use or dropped items can chip or crack marble, which will need to be fixed carefully.
How to Get Ready for Marble Restoration
Ready to bring back the shine? It’s best to be prepared first.
Know what type of marble you have and get the right tools. This will help you avoid accidental damage and get better results.
Check Your Marble’s Type and Condition
Check what kind of marble you’re dealing with. Natural marble is softer and needs gentler handling than cultured marble, which has a protective top layer. Look closely for signs like dull spots, scratches, chips, and stains.
The surface condition will tell you how much work is needed. Light dullness may only need simple cleaning and polishing, while bigger problems like deep scratches, heavy stains, or chips may call for professional help.
What Tools and Products Will You Need?
Have the right gear ready before starting. Stay away from strong cleaners!
For basic marble care, you’ll need:
- A pH-neutral stone cleaner designed for marble.
- Warm water.
- Soft microfiber cloths and a soft mop.
- Soft brush (for any stuck dirt).
- Poultices or special removal products for stains (baking soda for oils, hydrogen peroxide for organic).
- Marble polishing powder or cream.
- Buffing pads or a soft buffing cloth.
- A marble sealer (penetrating types are preferable).
- Protective gloves and glasses.
- If you’re dealing with big scratches, you may need diamond polishing pads of different roughness levels.
Make sure the area is clean before you start work.
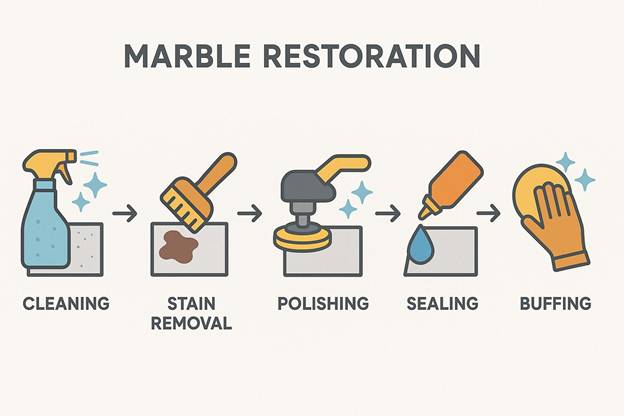
How to Restore Marble Step by Step
Once you know what you’re working with and have your supplies, you can start bringing your marble back to life. Follow these steps for best results.
1. Cleaning the Marble Thoroughly
Begin by clearing away loose dirt and dust with a soft cloth, mop, or a vacuum cleaner with a soft attachment.
Next, wash the marble using a pH-neutral stone cleaner mixed with warm water. Scrub gently with a soft cloth or brush, working on one small area at a time.
Don’t use too much water. Rinse with fresh water and wipe dry completely with a fresh, soft cloth. Keeping the marble dry is very important.
2. Dealing With Different Stains
Different stains need different approaches:
- Oil stains (grease, makeup): Mix baking soda and water into a paste. Cover the stain, wrap with plastic, and tape the edges. Wait at least 24 hours, then remove the paste and clean the spot.
- Organic stains (coffee, tea, wine, juice): Use hydrogen peroxide with a little ammonia, but be very careful. Never mix with bleach and always have fresh air in the room. Leave the solution or paste on for several hours before cleaning.
- Water spots or hard water stains: These can often be removed by gently rubbing with a dry soft cloth after cleaning. A marble-friendly cleaner can help with tough spots.
- Rust stains (from metal): These are tough to remove. You may need special marble rust remover or professional help.
Always test any stain remover on a hidden area. Call in a professional if the stain doesn’t come out or if you’re not sure what it is.
3. How to Polish for a Shiny Surface
After cleaning and stain removal, your marble should be ready for polishing. Light scratches or mild dullness can be polished out with marble polishing powder.
Mix the powder with a little water as directed and gently rub it on in circles using a soft cloth or low-speed buffer. Move in sections and don’t let it dry out.
If using a machine for deeper scratches, slowly move up to finer (smoother) pads for the best shine.
If the marble is very scratched or etched, professionals use diamond abrasives and a process called honing to fix deeper problems. Sometimes, pros also use a method called crystallisation for even more shine and hardness.
4. Sealing to Keep Marble Protected
After polishing, seal the marble so stains and damage won’t happen again soon. Because marble soaks up spills, sealing is very important. Only seal clean, dry marble.
Apply the sealer evenly with a cloth, following the instructions, and let it soak in for the time given (usually 15-30 minutes). Wipe away leftover sealer before it dries.
High-use areas (like kitchen or bathroom counters) should be sealed every 6-12 months. Other places can go longer between sealings.
5. Buffing for the Final Shine
Once the sealer has set (usually 24 hours), give the marble a final buffing. Use a clean, dry buffing pad or cloth. Move in circles until you get the look you want. This last step brings out the deepest shine and smoothness.
Summary
You can get your marble shining again with the right approach. Understand that marble is soft, porous, and sensitive to acids and scratching.
Long-term, develop good care habits: wipe spills at once, use mats, coasters, and gentle cleaners. Regular upkeep will help keep your marble at its best far into the future.